1.. Required Software –
Eclipse
Tomcat (7.0.25)
JDK
1.6Jersy Artifact
2. Prepare Working Environment
Extract eclipse-jee-win32.zip as D:\demo\ws-cxf-support
sw\eclipse
Extract apache-tomcat-x.x.x.zip as D:\demo\ws-cxf-support
sw\tomcat
Extract jersy.zip as D:\demo\ws-cxf-support sw\Jersy
TOMCAT_HOME =
D:\demo\ws-cxf-support sw\tomcat
JAVA_HOME =
D:\demo\ws-cxf-support sw\JDK1.6
3. Create a workspace
as D:\demo\workspace
Getting started with
RESTful Web Service
1 . Right Click package
explorer
Select
new - >Dynamic web project
2 . Select modify button which is part of
configuration
3. In New Opened window
Select Dynamic web module
as – 2.5
Java as 1.6
JAX-RS(REST web
service) - 1.1
4. Click on Save as –
In new Opened window
Enter Name - JAX-RS(REST
Web Services)
Description - JAX-RS(REST Web Services)
Click on Ok
6. Now Enter the Project Name as - RestFulWS
7. Verify all other
combination as follows
Target Runtime – Tomcat
7.025
Dynamic web module version
– 2.5
Configuration – JAX-RS(Web
Services)
Click on Next
8. Click on Next
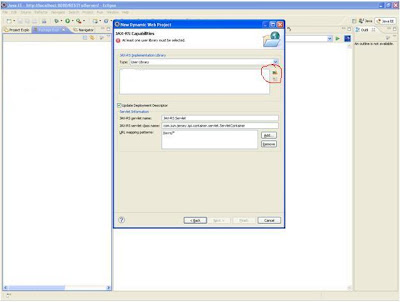
9. Click on Next following new window opened, Click
on the mark area to add library
10. Following New window
opened
11. Click on New
Enter User Library Name as - JAX-RS
Add system library added
to boot class path
12. Click on Ok
Select above Created user
Library – JAX –RS and Click on Add Jar
Add the following jar for
the above created user library
asm-3.1.jar
jersey-servlet-1.11.jar
jersey-server-1.11.jar
jsr311-api-1.1.1.jar
13. Select User Library as
JAX-RS and Click On Ok
14. Check User Library
JAX-RS
Servlet Class Name as - com.sun.jersey.spi.container.servlet.ServletContainer
15. Click on finish, New
Project get Created as “RestFulWS”
16. Verify for the web.xml as
following
<servlet>
<description>JAX-RS
Tools Generated - Do not modify</description>
<servlet-name>JAX-RS
Servlet</servlet-name>
<servlet-class>com.sun.jersey.spi.container.servlet.ServletContainer</servlet-class>
<load-on-startup>1</load-on-startup>
</servlet>
<servlet-mapping>
<servlet-name>JAX-RS
Servlet</servlet-name>
<url-pattern>/rest/*</url-pattern>
</servlet-mapping>
17. Now create new package
under src folder – “com.rest.ws”
18. Create a new class under
created package name as - ExampleWithOutParam.java
Put the annotation for
Created class as
@Path (“/exampleWithOutParam”)
Public class ExampleWithOutParam{
}
Define path is used to
call the above class
19. Add the following method
as a part of above class
@Path("/getName")
@GET
@Produces(MediaType.TEXT_PLAIN)
public String getName(){
return "Executed
getName Successfully";
}
How to call -
http://localhost:8080/RestFulWS/rest/exampleWithOutParam/getName
Create a new class name as
@Path("/loginService")
public class LoginServiceWithAllParam {
}
Add all following method as part of above class.
@MatrixParam
If want to pass the multiple values with the web service URL then we can use as follows.
@GET
@Path("/validateWithMultipleQueryParam")
public String validateWithMultipleQueryParam(@MatrixParam("userName") String
userName,@MatrixParam("password") String password) {
System.out.println( " Enter User Name as "+ userName);
System.out.println( " Enter password "+ password);
if("SHRIKANT".equalsIgnoreCase(userName)
&& "PASSWORD".equalsIgnoreCase(password)) {
return "Matrix Param request executed successfully";
} else {
return "Matrix Param request executed un successfully";
}
}
How to call -
http://localhost:8080/ RestFulWS/rest/loginService/validateWithMultipleQueryParam;userName=shrikant;password=password
@QueryParam
If want to pass the values with the web service URL as a query param then we can use as follows.
@GET
@Path("/validate")
public String validate(@QueryParam("userName") String userName) {
System.out.println( " Enter User Name as "+ userName);
return "query param request executed successfully";
}
How to call -
http://localhost:8080/RestFulWS/rest/loginService/validate?userName=shrikant
@DefaultValue
If no value pass with web service url and user need to use default value. then we can use as follows.
@GET
@Path("/validateDefault")
public String validateDefault(@DefaultValue("admin")
@QueryParam("userName") String userName) {
System.out.println( " Enter User Name as "+ userName);
return "default value request executed successfully";
}
How to call -
http://localhost:8080/RestFulWS/rest/loginService/validateDefault
@HeaderParam
If user required header related values for manipulation then we can use as follows.
@GET
@Path("/findBrowser")
public String findBrowser(@HeaderParam("User-Agent") String userAgent) {
System.out.println( " User used browser as "+ userAgent);
return "header param request executed successfully";
}
How to call -
http://localhost:8080/RestFulWS/rest/loginService/findBrowser
@CookieParam
If user required values from browser to manipulate then we can use as follows.
@GET
@Path("/findBrowserCookie")
public String findBrowserCookie(@CookieParam("sessionid") String sessionid) {
System.out.println( " User session id as "+ sessionid);
return "cookie param request executed successfully";
}
How to call -
http://localhost:8080/RestFulWS/rest/loginService/findBrowserCookie
@FormParam
if user need to pass the value in bean object then we can use as follow.
login.jsp
<%@ page language="java" contentType="text/html; charset=ISO-8859-1"
pageEncoding="ISO-8859-1"%>
<!DOCTYPE html PUBLIC "-//W3C//DTD HTML 4.01 Transitional//EN"
"http://www.w3.org/TR/html4/loose.dtd">
<html>
<head>
<meta http-equiv="Content-Type" content="text/html; charset=ISO-8859-1">
<title>Insert title here</title>
</head>
<body>
<form method="POST" action="rest/loginService/validateLogin">
User Name: <input type="text" name="userName">
Password : <input type="text" name="password">
<input type="submit"></form>
</body>
</html>
LoginForm.java
package com.rest.ws;
private String userName;
private String password;
return userName;
}
public void setUserName(String userName) {
this.userName = userName;
}
public String getPassword() {
return password;
}
public void setPassword(String password) {
this.password = password;
}
@POST
@Path("/validateLogin")
public String validateLogin(@FormParam("userName") String userName,
@FormParam("password") String password) {
System.out.println( " Enter User Name as "+ userName);
System.out.println( " Enter password "+ password);
if("SHRIKANT".equalsIgnoreCase(userName) &&
"PASSWORD".equalsIgnoreCase(password)) {
return "form param request executed successfully";
} else {
return "form param request executed un successfully";
}
}
How to call -
http://localhost:8080/RestFulWS/login.jsp
If Exception Found -
INFO: Marking servlet JAX-RS Servlet as unavailable
Mar 28, 2012 3:25:10 PM org.apache.catalina.core.StandardContext loadOnStartup
SEVERE: Servlet /RestFulWS threw load() exception
java.lang.NoClassDefFoundError:
check WEB-INF/lib
and place all the jar file which is used for use library(see 12.)
How to call -
http://localhost:8080/RestFulWS/rest/exampleWithOutParam/getName
Create a new class name as
@Path("/loginService")
public class LoginServiceWithAllParam {
}
Add all following method as part of above class.
@MatrixParam
If want to pass the multiple values with the web service URL then we can use as follows.
@GET
@Path("/validateWithMultipleQueryParam")
public String validateWithMultipleQueryParam(@MatrixParam("userName") String
userName,@MatrixParam("password") String password) {
System.out.println( " Enter User Name as "+ userName);
System.out.println( " Enter password "+ password);
if("SHRIKANT".equalsIgnoreCase(userName)
&& "PASSWORD".equalsIgnoreCase(password)) {
return "Matrix Param request executed successfully";
} else {
return "Matrix Param request executed un successfully";
}
}
How to call -
http://localhost:8080/ RestFulWS/rest/loginService/validateWithMultipleQueryParam;userName=shrikant;password=password
@QueryParam
If want to pass the values with the web service URL as a query param then we can use as follows.
@GET
@Path("/validate")
public String validate(@QueryParam("userName") String userName) {
System.out.println( " Enter User Name as "+ userName);
return "query param request executed successfully";
}
How to call -
http://localhost:8080/RestFulWS/rest/loginService/validate?userName=shrikant
@DefaultValue
If no value pass with web service url and user need to use default value. then we can use as follows.
@GET
@Path("/validateDefault")
public String validateDefault(@DefaultValue("admin")
@QueryParam("userName") String userName) {
System.out.println( " Enter User Name as "+ userName);
return "default value request executed successfully";
}
How to call -
http://localhost:8080/RestFulWS/rest/loginService/validateDefault
@HeaderParam
If user required header related values for manipulation then we can use as follows.
@GET
@Path("/findBrowser")
public String findBrowser(@HeaderParam("User-Agent") String userAgent) {
System.out.println( " User used browser as "+ userAgent);
return "header param request executed successfully";
}
How to call -
http://localhost:8080/RestFulWS/rest/loginService/findBrowser
@CookieParam
If user required values from browser to manipulate then we can use as follows.
@GET
@Path("/findBrowserCookie")
public String findBrowserCookie(@CookieParam("sessionid") String sessionid) {
System.out.println( " User session id as "+ sessionid);
return "cookie param request executed successfully";
}
How to call -
http://localhost:8080/RestFulWS/rest/loginService/findBrowserCookie
@FormParam
if user need to pass the value in bean object then we can use as follow.
login.jsp
<%@ page language="java" contentType="text/html; charset=ISO-8859-1"
pageEncoding="ISO-8859-1"%>
<!DOCTYPE html PUBLIC "-//W3C//DTD HTML 4.01 Transitional//EN"
"http://www.w3.org/TR/html4/loose.dtd">
<html>
<head>
<meta http-equiv="Content-Type" content="text/html; charset=ISO-8859-1">
<title>Insert title here</title>
</head>
<body>
<form method="POST" action="rest/loginService/validateLogin">
User Name: <input type="text" name="userName">
Password : <input type="text" name="password">
<input type="submit"></form>
</body>
</html>
LoginForm.java
package com.rest.ws;
import javax.ws.rs.FormParam;
public class LoginForm {
@FormParam("userName")
private String userName;
@FormParam("password")
private String password;
public String getUserName() {
return userName;
}
public void setUserName(String userName) {
this.userName = userName;
}
public String getPassword() {
return password;
}
public void setPassword(String password) {
this.password = password;
}
}
@POST
@Path("/validateLogin")
public String validateLogin(@FormParam("userName") String userName,
@FormParam("password") String password) {
System.out.println( " Enter User Name as "+ userName);
System.out.println( " Enter password "+ password);
if("SHRIKANT".equalsIgnoreCase(userName) &&
"PASSWORD".equalsIgnoreCase(password)) {
return "form param request executed successfully";
} else {
return "form param request executed un successfully";
}
}
How to call -
http://localhost:8080/RestFulWS/login.jsp
If Exception Found -
INFO: Marking servlet JAX-RS Servlet as unavailable
Mar 28, 2012 3:25:10 PM org.apache.catalina.core.StandardContext loadOnStartup
SEVERE: Servlet /RestFulWS threw load() exception
java.lang.NoClassDefFoundError:
check WEB-INF/lib
and place all the jar file which is used for use library(see 12.)


